How To Burn Comodo Rescue Disk To Usb
Comodo rescue disk is a bootable disk image - virus scanner that allows users to run virus scans in a pre-boot environment, runs Comodo Cleaning Essentials on the Linux operating system.
- Introduction To Comodo Client Security
- The Main Interface
- General Tasks - Introduction
- Scan And Clean Your Computer
- Run A Custom Scan
- Scan And Clean Your Computer
- Firewall Tasks - Introduction
- Containment Tasks - Introduction
- The Virtual Desktop
- DLP Tasks - Introduction
- Advanced Tasks - Introduction
- Create A Rescue Disk
- View CCS Logs
- CCS Advanced Settings
- General Settings
- Manage CCS Configurations
- Antivirus Configurations
- Firewall Configuration
- Network Zones
- HIPS Configuration
- HIPS Groups
- Protected Objects
- Protected Objects - HIPS
- Protected Objects - Containment
- Data Loss Prevention
- Containment Settings
- File Rating Configuration
- Advanced Protection
- Web Filter Settings
- General Settings
- Appendix 1 - CCS How To.. Tutorials
- Appendix 2 - Comodo Secure DNS Service
Download and Burn Comodo Rescue Disk
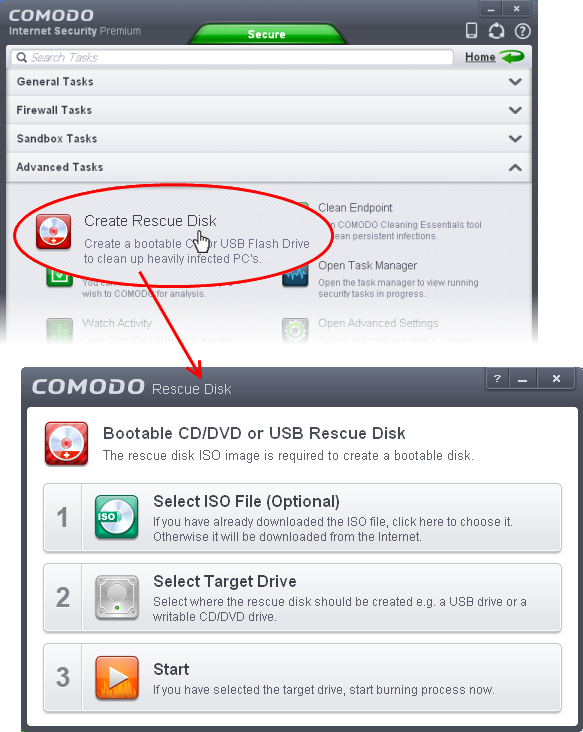
- Click 'Advanced Tasks' on the CCS home screen
- Click 'Create Rescue Disk':
The setup screen shows the steps to create a new rescue disk:
Pinnacle dazzle dvc 80 usb digital video creator capture device. Dazzle USB Video Capture Device Capture Directly from Analog sources, including VCRs, camcorders and game systems, and even DVD Players. Pinnacle Studio for Dazzle Cut and trim your videos, add titles and transitions, and create DVD menus. Product description Pinnacle's Dazzle Digital Video Creator DVC 80 is the ultimate USB 2.0 - 1.1 video connector that lets you capture video & stereo (left & right) audio from a camcorder, TV, or VCR directly to your PC. Requires - Pentium II 300MHz or higher computer with 64MB of RAM and Windows 98, ME, 2000 or XP installed. This device features a simple design that has an AV input to plug into analog electronics and a USB 2.0 output for connecting to a computer. It can record from electronics such as VHS players, gaming consoles, Hi8 and V8 cameras, laserdisc players, and more. Dazzle DVC 80 (2): Dazzle Digital Video Creator 80 is an external, USB video transfer cable for anyone, with any type of camcorder, who would like to get started editing digital video on the PC.
Step 1- Select the ISO file
Optional. If you have already downloaded the rescue disk ISO from Comodo then please select it here. If you haven't yet downloaded then please ignore this step - it will be downloaded automatically during Step 3.
Step 2 - Select target drive
Select the CD/DVD or USB on which you want to burn the rescue disk. You will boot to this disk to run the antivirus product.
Burn to a CD or a DVD
- Label a blank CD or a DVD as 'Comodo Rescue Disk - Bootable' and load it in your CD/DVD drive.
- Click 'Select Target Drive' in the 'Rescue Disk' then choose the drive in the 'Select Target Drive' dialog.
- Click 'OK'.
Burn to a USB drive
- Insert a formatted USB stick in a free USB port on your computer
- Click 'Select Target Drive' in the 'Rescue Disk' dialog
- Select the drive from the 'Select Target Drive' dialog and click 'OK'
Step 3 - Burn the Rescue Disk
- Click 'Start'
- If you selected a local ISO in step 1 then burning will start immediately. If not, the ISO will be downloaded from Comodo servers:
After downloading, setup will burn the ISO to your target drive:
- Wait until the write process is complete - do not eject the CD/DVD/USB drive early. The CD/DVD/USB will be ejected automatically once the burning process is finished.
Your bootable Comodo Rescue Disk is ready.
- Click 'Continue' to go back to CCS interface
Installing SystemRescueCd on a USB stickThis page explains how to install SystemRescueCD on a USB stick.Installing SystemRescueCd on an USB stick allows you to use the system from aUSB stick instead of using a DVD. You need a recent SystemRescueCd, and aUSB stick with enough space. You need at least 2GB unless you have removedfiles from the official version. You will have to get your firmware (BIOS/UEFI)to boot from the USB device before it attempts to boot from the local disk.This can be configured either in the firmware settings or by pressing a key atboot time.This page describes the best options available for installing such a USB stick.